I have been a long-time lurker over at OWWM.org, a forum dedicated to the love of old woodworking tools, and its sister site, VintageMachinery.org. After my 9-year-old son watched a few woodworking videos with me, he expressed an interest in learning how to turn on a lathe. That was music to my ears! I immediately began searching Craigslist and was able to find an old Sears Dunlap wood lathe.
The lathe, Model 103.0602, was made in the early 1940s by a company called Central Specialty, for the Dunlap line at Sears. Dunlap was the entry level model of tools offered by Sears, with Craftsman being the higher-end models.
A few items to note about this lathe:
1. The tail stock does not have a live end, but rather a dead end, which means the pin that holds the right side of the wood does not spin. In order to keep the wood from building up to much friction and creating a high pitched squeal, all you have to do is scrape an old candle onto the end of your work piece…viola…no more squeal!
2. The head stock has two bronze bushings in which the spindle turns, instead of ball bearings. Those bronze bushings are porous, and by adding tool oil into the oil ports on the top of the head casting, they stay lubricated.
3. This lathe is a very entry level model, hence the dead end in the tail stock and the bronze bushings, but it has history and a certain “cool” factor, and it is a very simple machine, so it was a perfect candidate for my first tool restoration.
The lathe was in plug-and-play condition, and came complete with the original motor, a Dunlap 1/3 HP motor (Modle 115.6960), and a homemade stand onto which the lathe and the motor were mounted.
Initially, I just wanted to polish it up and start turning with my sons, but after using some steel wool and paste wax, there was just to much age and abuse on the outside, so I decided a complete restoration was in order. This would give me a chance to not only give the lathe a new look, but to also fix the “internals”.
Tearing the lathe apart was a pretty simple process. I lightly sanded and thouroughly cleaned all the parts with an oil and wax remover prior to priming. I used a Krylon primer because that is what I had available. All the bolt holes were filled and the chrome handles were masked off prior to priming.
I believe the lathe, at the time of purchase, had its original paint color, which was a dark blue/grey color. I was not to concerend with trying to match it perfectly, so I decided to use this rich navy blue. Two to three coats gave me the coverage I needed. A quick note on spray paint. Read the application directions closely. They are not there just to fill up the blank space on the label! Make sure the metal is clean from grease and oils and is not to hot or cold. Also, from my limited understanding, additional coats need to be applied within an hour of each other, in order to melt together to form one cohesive layer, or after 24 hours, which allows each layer to fully cure prior to being entombed by the next layer.
After painting all the parts, the cool art deco details on the head and tail stock were screaming out for attention. I carefully masked off all the areas that did not need to be painted and used a partial can of stainless steel paint to really make the “wings” pop against the rich blue body.
After the paint had cured for a few days, I cleaned and polished the metal on the tool rest and the tail stock, as well as the spindle and pulley in the head stock. I then lubed the thrust bearing with some lithium grease and assembled the lathe.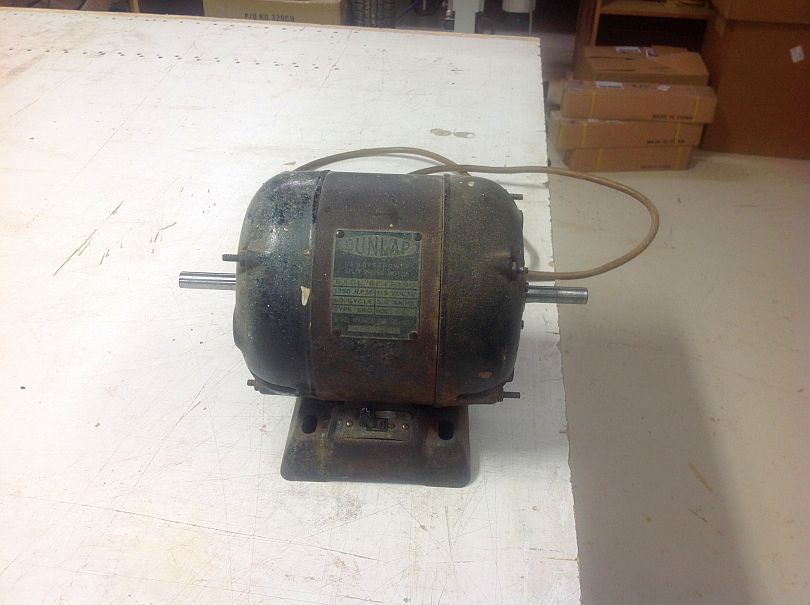
As I stated earlier, I believe this Dunlap 1/3 HP motor is original to the lathe. The exterior shows that it has been through a lot in its 70+ years of life but, amazingly enough, when it is switched on, it purrs so quietly and smoothly. I could have left it as it was, if it wasn’t for the ugly exterior.
Motors were completely foreigh to me, so it was with much trepidation that I began to disassemble the motor. Thanks to this post on the Garage Journal forum I had the confidence to begin.
I slowly took the motor apart, making sure to take many pictures along the way, so I had plenty of reference later on if I ever got stuck during the reassembly. The bearings felt perfectly fine, with no slop or play, so I decided to just clean them out and repack them with lithium grease.
The rotor and the stator wires were quite dirty and dusty, but not knowing exactly how fragile they were or weren’t, I erred on the safe side and lightly brushed them off with a soft wire brush and blew out the dust with compressed air.
I cleaned, sanded, primed, and painted all the motor parts with Rustoleum Hammered Black paint.
The metal band that the name plate was a connected to was a mess, so I masked off the name plate, lightly sanded the metal band, and painted it with a can of stainless steel paint. The name plate was also a hot mess, and I wanted to clean it up all nice and shiny, but I didn’t want to sand off the printing during the cleaning process. I played it extra safe and, using only warm soapy water, I scrubbed away the dirt and grime. I finished up by polishing it up with a little paste wax to add back some luster.
After a few hours of work it sure looks a whole lot better! I also replaced the ungrounded cord with an old computer cable that I had stowed away in my desk.
When I bought the lathe, it came mounted to an OSB cart, which was quite sturdy, but not very pretty. Being a woodworker, I wanted to change that. We recently repaired and partially rebuilt a dining table, so I had a large plate of solid Red Oak in the corner of the shop. I cut it down to the correct size, sent it through the widebelt sander to remove the old finish, routed a nice detail on the edges, and sprayed on a few coats of lacquer. I then mounted the lathe and the motor, replaced the V-belt with a link belt, and called the project done!
A few weeks later, I purchased a cheap set of lathe tools off Craigslist and decided to make a nice holder for them, so they would be mounted within easy reach. Using more of the salvaged dining table, I fabricated a simple, yet secure, tool holder.
After using the lathe a few times, I was not liking the mechanics of turning the motor on and off. The previous owner had the switch on the back side of the motor, which was the safest location, but not at all convenient. I mounted the switch on the front, but it was not at all safe, since your hand would be right near the belt. I needed to change that right away.
My solution was to run the power cord into a light switch mounted on the back right corner of the lathe plate. Now, in order to turn the lathe on, the user will be far away from the spinning head and belt.
Here is the final machine, fully assembled with the tool holder and the revised on/off switch. In the two months since the lathe has been functional, we have turned half a dozen items, and have found the cheap lathe tools woefully lacking. The metal is as soft as can be and we can barely turn a soft piece of pine before it becomes to dull to use…so frustrating! So, using some birthday money, we went to the local Woodcraft store and purchased two Sorby turning gouges, a 3/8″ and a 3/4″. What a world of difference!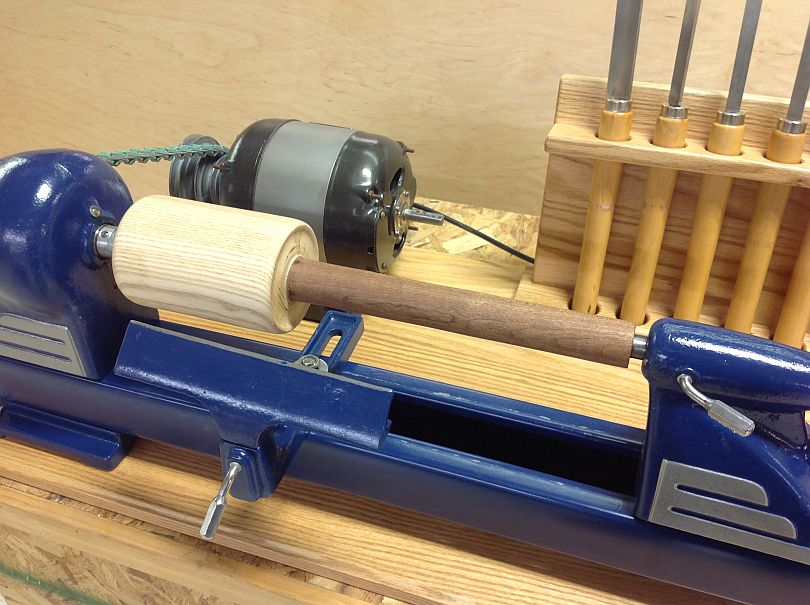
My first turning project was this wooden mallet. The handle is Sapele and the head is Ash.
As I originally stated, this lathe purchase was initiated by the request of my oldest son. As soon as the weather allowed, I brought the lathe home and we began working on projects. Here he is final sanding his first light saber handle.
Here is my youngest also turning a light saber handle. (Am I sensing a theme here?) The small size, relatively low power, and inherent limitations of the lathe have made it a great starter machine for us to learn on. We have all been enjoying it enough that I think it will stay a permanent fixture of our work shop!


Have something to say? Share your thoughts with us in the comments below.