I've had my fair share of finishing troubles, some of them pretty monumental, I like to think that I learn something from these challenging experiences and that I will never repeat them. But, as I keep learning, new challenges crop up that find me attempting to outdo myself.
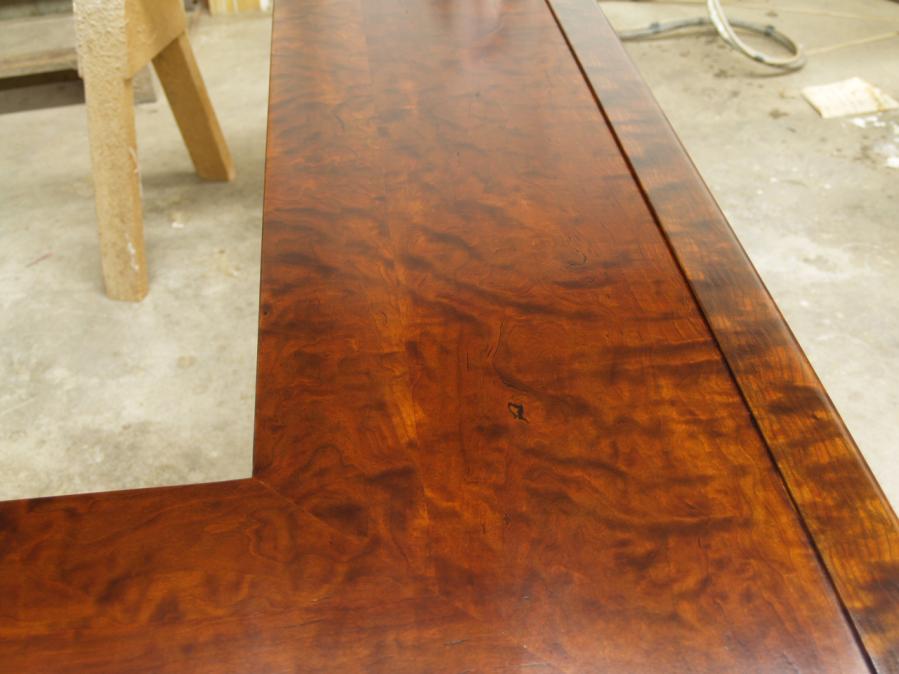
A prime example is a bar top I made from curly cherry. The finishing job was like any other finishing job in my mind – easy peasy lemon squeezy. All I had to do was mix up some lye and water, slather it on the cherry to darken it, sand the surface a bit and finish it with three coats of Krystal.
The lye should take about 15 minutes, the sanding about 20 minutes and the three coats of Krystal about two hours. The longest part of the whole thing should have been waiting for the lye/water solution to dry, which was about two hours. But, as all good stories go, I ended up monkeying with it for about three days. My, how time flies when you’re screwing up a good finish.
Applying the Finish Step by Step
I started with the lye and mixed it with water. My first test piece looked great, so I rolled with it. I wasn’t too worried about this step because it always seems like this phase of the process magically works itself out. As the lye sits on the piece drying, spots that I worried about just seem to fix themselves. Areas that looked too light blended seamlessly with areas that quickly turned dark. The only spots that didn’t darken perfectly were under errant splotches of glue, which I stained with another favorite, TransTint dye stain, this time in reddish-brown.
After I let the lye/water solution dry thoroughly, I sanded the entire top with 320 grit sandpaper. This step too, was no big deal. The lye darkens the wood pretty deeply, so even somewhat aggressive sanding won’t expose any new lighter-colored wood. At this point, I had put in no extra time and things were going smoothly. On to the next step, I said.
It was already time to start spraying, so I mixed up a batch of Krystal conversion varnish and catalyst. I also added a little lacquer thinner to make it flow nicer. My plan was, and always is, to shoot lightly on the first coat, the logic being that the first coat is really just to get the process started and to get the wood fibers locked in place.
Normally, after the first coat, I either lightly sand with 400 grit paper or scrape flat surfaces with a razor blade to smooth things out for the next coat. In this case, however, I never got that far. The Krystal never set up. It went on nicely, but I let it sit for four hours and it was still tacky. That stuff is normally sandable in 30 minutes or so. Four hours was crazy, and I knew something was wrong. And, so it started.
Re-doing the Finish Step by Step
I decided to remove the finish with lacquer thinner and start over. It wiped off like it was going to set up on the 12th – the 12th of never. At that point, I decided to take the finish out of the equation and ordered a fresh gallon. New finish never hurts anything.
The next day my new finish arrived, and I mixed up a batch. I shot the second first coat and it went on fine. Then, as I waited and stared at the finish (like all of us do), I noticed a couple of streaks that were bumpy. It looked like there was dust in the finish, but it wasn’t dust, it was more than dust. I couldn’t figure it out.
I waited for the finish to dry (I recommend that you always let the finish dry before you mess with it) then I sanded the bumpy spots. I sprayed the next coat and the bumpy spots were better, but still wanted to get bumpy. I had it narrowed down to two spots that just needed a little more love. I sanded them a bit extra to make sure they were really smooth. I sprayed away and the craziest thing happened.
The two spots that I had just smoothed out wrinkled like crazy. They looked like I put stripper on them. I worked with those spots for a couple more tries, but they only got worse. Every time I sprayed, the margins of my repair bubbled up, and it became obvious that I was chasing my tail. Time to start over. Well, time to call the customer, tell him for the second day in a row that his top was not going to be done and start over.
Assessing the Problems; Rooting Out Their Cause
At that point, I had come up with some ideas on the cause of my problems. My best guess was that the lye was messing with the chemical reaction in the Krystal that makes it set up. I haven’t had trouble with other finishes (mostly nitrocellulose lacquer and acrylic-modified lacquer) on top of lye, but this was the first time that I went over it with Krystal. The first first coat didn’t set up, which could be caused by the lye. After I cleaned that coat off, there may have only been a couple of small spots with a lot of lye in them, and those areas were exposed more every time I sanded.
I knew now that I need to make sure that the surface was clean and free of lye. I stripped down the second layers of finish with the help of lacquer thinner and started over, again. I reminded the bar top that I was going to win and that all of this resistance was futile, in hopes that it would stop with the temper tantrums and just behave. To make sure it behaved, I wiped and wiped and wiped some more on the surface with lacquer thinner to get every foreign substance out of my way.
Whatever I did, it finally worked. I sprayed the top with the first coat (for the third time) and it went on great. I shot two more coats and in about two hours delivered the top, late on the third night (I have a special policy of delivering free, late on Friday nights, after the customer has been by the shop two previous evenings in a feeble attempt to pick up their countertop). The customer was very understanding and I think, quite glad to see me. I was glad to see him too and get that thing out of the shop. Sort of….
New Troubles More Remedies
The following Monday I got a call from the customer. I would normally dread a call so close to delivery because there had to be a problem, but I knew this was different. I was sure he was just calling to say how nice it looked and to thank me for going the extra mile. Not the case.
Two days earlier, on Saturday night, they had a Halloween party, which was the reason for the push to get the top done. Apparently, someone put a glow necklace on the top which proceeded to leak. The toxic chemical melted through the finish and even lightened up the lye. On top of that, along with a new bar top came new barstools with backrests and swivel seats, which swiveled nicely into the front of the bar, scraping off the finish. Back to the shop it came.
After playing with the finish it was obvious that I had adhesion issues, the finish just scraped off with my fingernail (not good for a bar top). After a break from the top, I sanded the whole thing down again, reapplied the lye, wiped it a lot with clean water and proceeded to reapply the Krystal finish. Most of it worked well, except for the front of the bar rail. It had the tiniest area of tiny bubbles that just didn’t lay down. Being a picker, I had to pick and it flaked off easily again, but only on the front. I had to work harder to get the finish off of the side rails. Below is a video of how easy the finish flaked off. Again, not good for a bar top.
So, obviously I have a problem, one that I have never had before. The lye has worked fine for me in the past using regular lacquer. The difference this time is that I am using Krystal, which is a two-part finish (conversion varnish). My best guess is that the lye is messing with the chemical reaction because my test pieces, which had no lye on them, stuck like crazy. To combat the problem, I first sprayed a sanding sealer and then put the Krystal on top. The plan is that the sanding sealer will provide a protective barrier between the lye and the Krystal. So far, so good. Hopefully, there are no new updates. They can only be bad.


Have something to say? Share your thoughts with us in the comments below.