
About 35 years ago, a client asked me to reproduce a carved historic element that had deteriorated and fallen off the façade. I gave him my usual answer, “Yes!” even though I wasn’t sure how I was going to do it. At first I was a bit intimidated, but then I became intrigued. I have a unique skill set as a woodworker, sculptor, and artist, and I knew I was up for it.
I’ll share a few tips in the restoration trade and use my most recent project as an example.

A major challenge was the condition of parts that had to be restored. Some disintegrated during disassembly. Some parts were plaster and some carved from log ends that checked dramatically over time.
Our Lady of Victory
When a Rochester, N.Y.-based architectural firm, SWBR Architects, was involved with the restoration of the interior of Our Lady of Victory Church, circa 1868, one of the oldest churches in Rochester, they called on me to assist with some of the elements.
The church selected a world-renowned liturgical restoration firm, Granda out of Europe; the project started with removing the altar and shipping it to Spain where the wooden statues and millwork would be stripped, re-carved, gilded, painted, and fully restored. The balance of in-place architectural millwork with a similar spec, was left to me.

This column capital shows some of the work required to restore physical integrity before cosmetic finishing could even begin.
Bidding the job
Four tall fluted columns with Corinthian capitals, two arched friezes, and 20 large 2-foot finials hanging on the ceiling 25 feet up needed complete restoration, and they wanted to save as much of the original millwork as possible. The church had had a fire in 1912 and the extent of the damage was unknown. I couldn’t give an accurate bid until I inspected the integrity of original millwork and determine how much time would be involved, so I suggested an exploratory phase contract.
Essentially, the first part was to figure out how much the job would cost. As woodworkers, we have knowledge that architects or engineers don’t have. For this project, they needed my expertise to help spec out my portion of the job. Tip: Make sure you know what you’re getting into: specs, timeline, budget, and finances (if/when you get a draw, when you get paid, who controls the money). Don’t assume anything, always consider the worst case scenario, and keep your client informed.
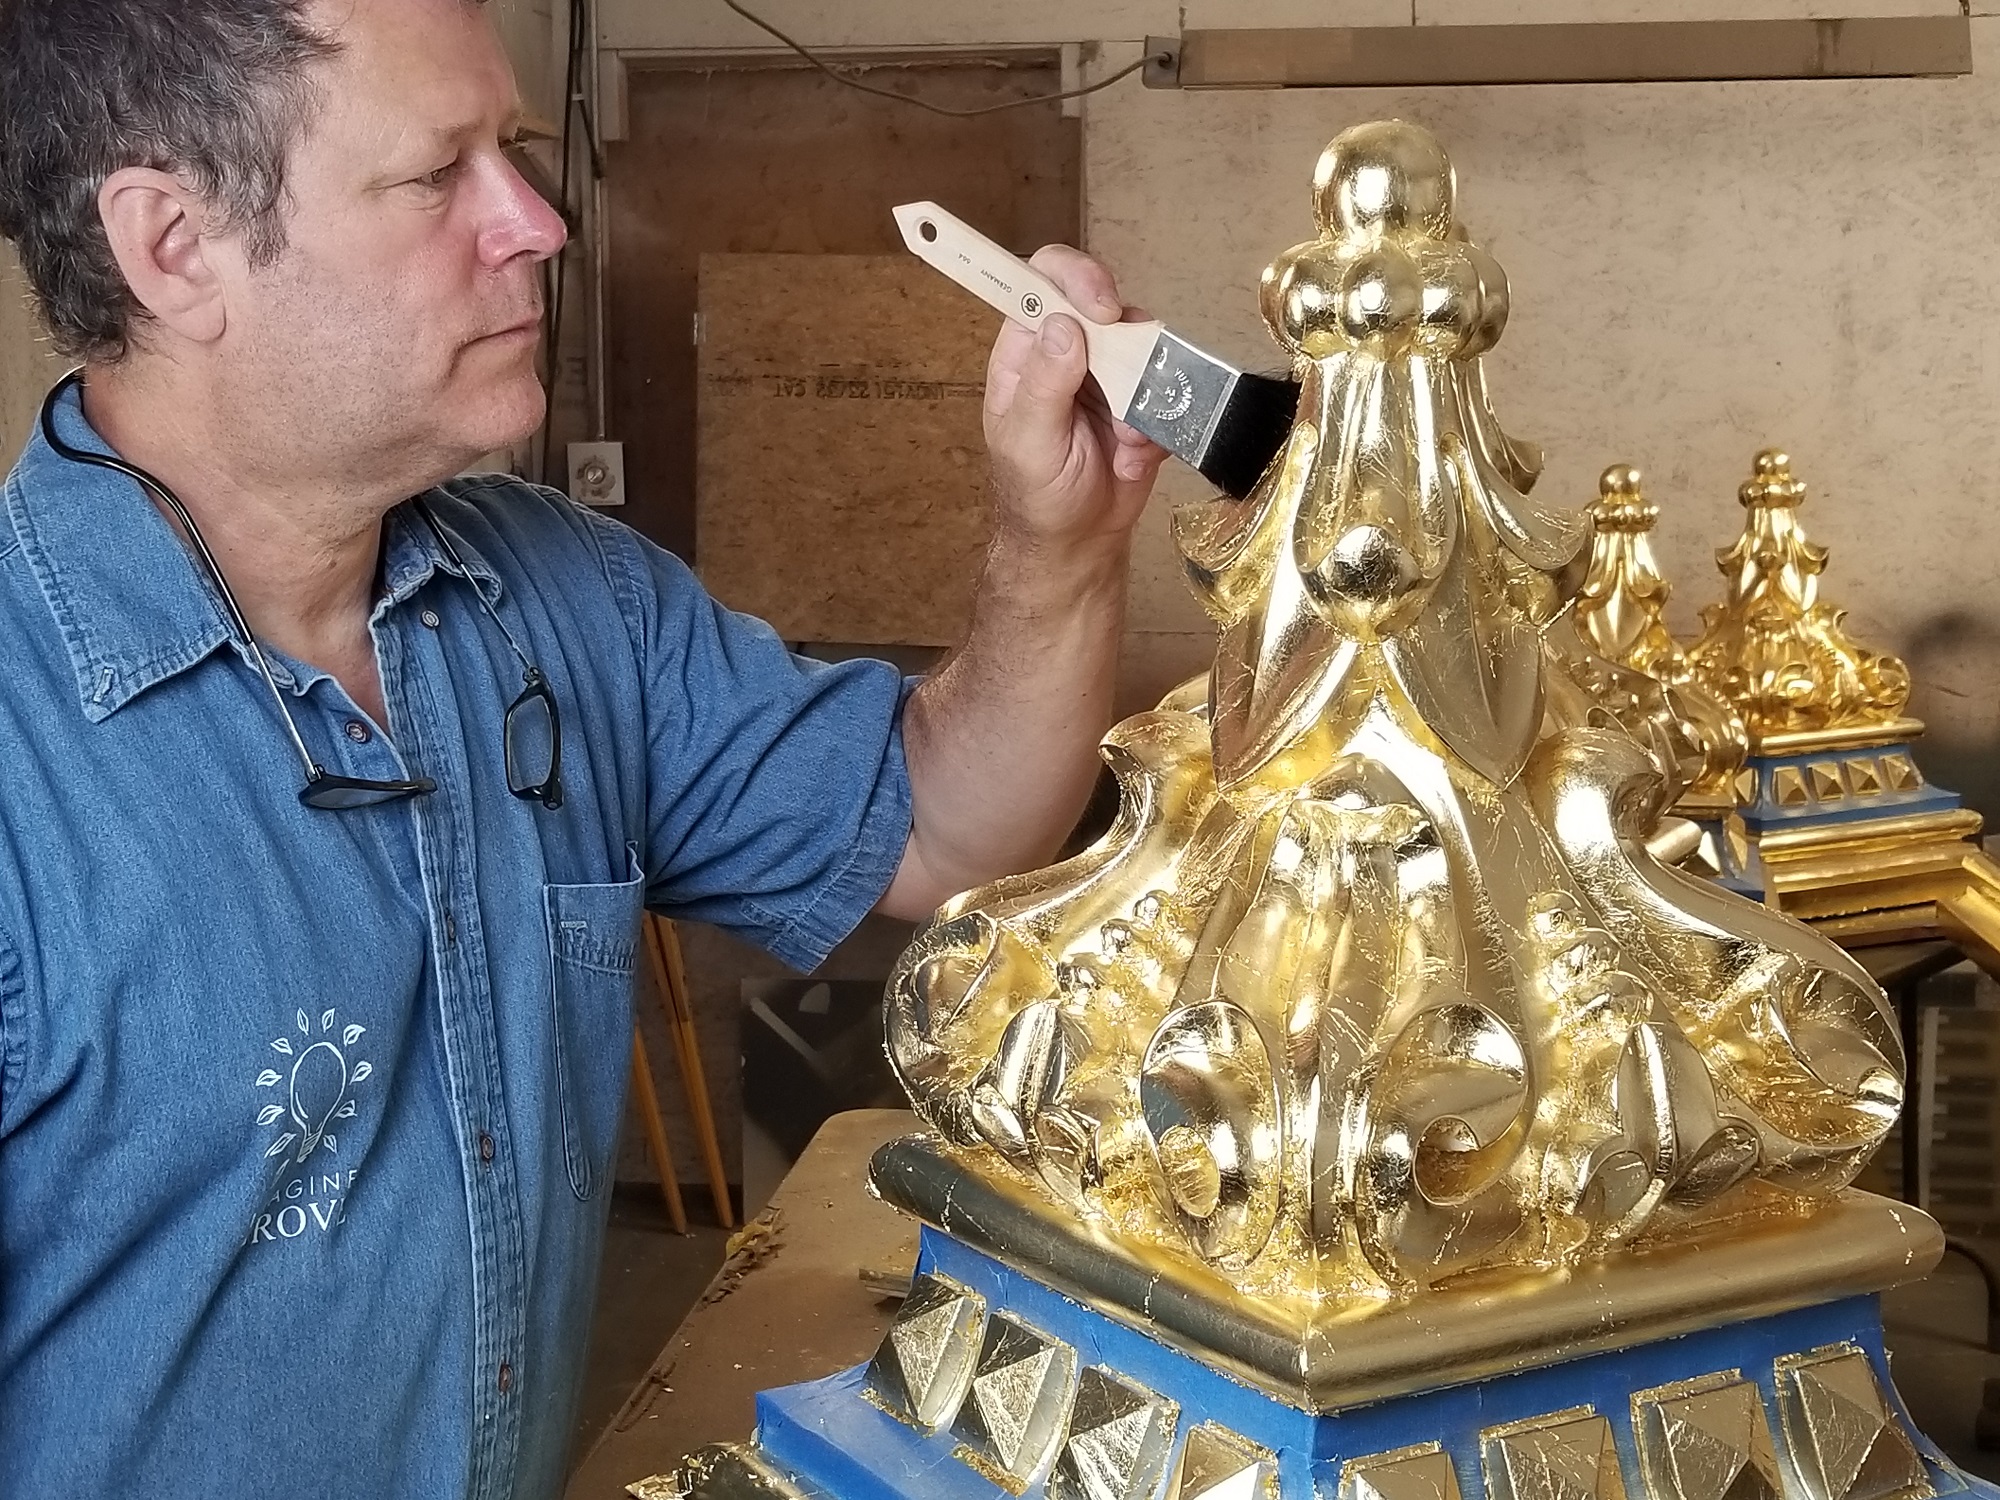
The author applies gold leaf to one of the ceiling finials using a process that is basically the same as it was 100 years ago.
After the scaffold
My portion of the project was three sections: column and frieze millwork; stripping and refinishing the assumed wooden carved capitals and ceiling finials; and gold leafing most elements.
Once the entire hall was scaffolded, I had access to the higher elements and we soon realized that a number of the finials, Corinthian column capitals, and curved millwork had previously been replaced in plaster after the fire. They could not be removed without damage, nor could they be stripped for refinishing.
The project quickly became more complicated, and there was no room to change the timeline. They had scheduled an important wedding in seven months—what were they thinking?!
I also found that none of the elements were straight, parallel, square, nor even symmetrical (the left arch had a different radius than the right arch). Also, all of the pieces would be removed and re-installed after our Spanish friends completed their install. This, too, added complexity. Tip: Take a complete set of in-place measurements (a laser is a must), record each element and location, photographing each piece as a reference for reinstallation.

It was important to make brand new gold leaf elements appear antique and historic, so after applying the leaf, a patina and glaze was added to make the bright gold look burnished and aged.
Capital one
I tried to remove the first plaster capital and it disintegrated. So did the next one, and the next, and I had only one more to go. I didn’t dare touch it. Instead, I relied on my sculpture background and took a silicone mold directly off the column onsite, using my experience, Smooth-On (a mold and casting supplier), their technical support, and online videos.
While casting, I discovered yet another major issue: The capital was asymmetrical! By the time I decided to cast the piece, we had only one left-sided capital left for our mold. I had to cut the casting apart, flip it, and re-mold the corner. The new side didn’t line up either: It was off by an inch. During installation, I had to re-carve and mold corners in place for visual alignment.
You’ve got a friend
With these hiccups and the looming deadline, I knew I would need help. I called upon a network of fine woodworkers and artisans to step in and keep the project on track. Finding the right craftsmen can be a challenge: Some work perfectly and too slow, others slam it together in a day with little understanding of tolerances. Tip: Understand the schedule, level of detail you need, the visibility of the elements (are these elements at eye level or 40 feet in the air?); and find the right balance between historic integrity, overall aesthetic, time line, and budget.

The finished ceiling finials stand out in the final restoration as a distinctive element in the Our Lady of Victory Church.
Final finials
The biggest challenge was reproducing the ceiling finials. The spec called for stripping and refinishing them, but four of the 20 were plaster and unsalvageable, which immediately ruled that out. In addition, the originals were carved from a single log section, and after stripping off many layers of paint, the predictable pith check gap was a 3/4-inch wide. They were also originally hung from deteriorated threaded rods, which extended up into the attic, and some were inaccessible.
The clock was ticking and we needed to reproduce them in a lightweight material, quickly and accurately. Did I mention the wedding? After repairing and re-carving one element with automotive putty, we made a rotational silicone mold using my wife’s old roller skates and my grandfather’s ¾-hp low-RPM drill. With the help of Smooth-On’s tech team, we worked nights and weekends. A 1/8-inch hard shell was cast inside the mold using Smooth-On Rotocast, which cures in 10 minutes. Then we filled the remaining void with a 5-pound expanding foam. This created a hard and lightweight element that could be screwed in place without the ½-inch steel hanging rod.
Obviously there were a few weeks of R&D and some tests to get the mix and timing just right, but once in production, we were able to cast four a day and were rockin’ and rollin’. Tip: While replacing elements in kind, sometimes it’s more cost effective and longer lasting to use fiberglass, foam, or other materials.

An overview of the church sanctuary gives a hint as to the scope of the restoration project.
Goldfinger
The final process was to gold leaf most of the reproduced elements and millwork, which was tedious but satisfying. This process hasn’t changed very much, and I felt like an old master working 100 years ago. (Okay, so we used spray guns to apply the gold size and finish, but still…). To conserve budget, we suggested using Dutch metal, a more affordable alloy, in lieu of real gold, which created significant savings. It was crucial to make these new elements appear antique, so after applying the leaf, we added a patina and glaze to make bright gold look burnished and aged.

A close-up reveals more detail of the restoration work on the historic Rochester, New York, church.
Victorious!
From traditional millwork, carving, mold making, casting in plaster and composites, faux finishing, and gold leafing, this and other architectural projects always yield a different set of challenges that keeps me on my toes and helps me grow my knowledge base. It’s also very gratifying to restore an ancient wonder back to its original grandeur and touch a piece of history.
I love to use traditional techniques that are fast becoming a lost art, and applying new ones that help the millwork and restoration industry. By using a combination of woodworking, sculpture, and various alternative materials, the restoration market is a viable niche for skilled craftsmen. Watch the video below to see some of the work in progress.


Have something to say? Share your thoughts with us in the comments below.