
A year or so ago I became very interested in restoring old vintage items, like tools and furniture, and incorporating salvaged items into some of my custom woodworking projects. Since then, I have amassed quite a collection of salvaged “junk” and other items for future restoration projects. At any one time I have two or so pieces in various states of completion, with half a dozen or so projects waiting in the wings.
The latest project I completed was an All Steel Equipment tanker desk that I purchased at an online auction back in February.

Here is the initial photo of the desk, as taken by the online auction company, and displayed in the listing.
There were a few other photos along with this one, so I was able to see most of the details and the desk’s overall condition. It was free from large dents, had no visible rust, and didn’t seem to be missing any parts, which is not always the case with old steel office furniture. Many pieces from this era seem to spend a great deal of time in harsh environments or in the hands of abusive owners.
I loved the fact that the desk had a pencil drawer and the three small drawers on the left, which would give it a bit more usability over one that had file drawers on the bottom of both sides. I also loved the style of the feet found on this desk.
In the end, all it took was $10 to be declared the winner and proud owner of the desk!

It was my intention from the start to give the desk a complete overhaul, which would mean disassembling it into a dozen or so pieces. Overall, the metal parts were in great shape, and free from any major rust. Just a wee bit of surface rust was found inside the bottoms of the cabinets. There were also a dozen or so small dings that would need to be filled, but nothing too difficult.
The top, on the other hand, was beyond salvaging, with its smashed edge and de-laminating layers, so I gave it away.
I began the work by disassembling the desk, labeling the parts, and scrubbing off decades of dirt, grease, and grime. Next, every square inch was scuff sanded using our 3″x4″ vibratory sanders…nothing too aggressive and easy to get into all the right angles. I then primed using Sherwin Williams Kem Kromik Universal metal primer. I purchased this primer about 5 years ago for a furniture piece, and it sat on the shelf, unused, ever since.
I have been very happy with this primer, as it seems to grab a hold of the metal with an iron grip. (Haha, see what I did there!) Also, applying primer with a spray gun sure beats applying it with spray cans. For large projects like this desk, a spray gun is able to lay down a much thicker coat so much faster!
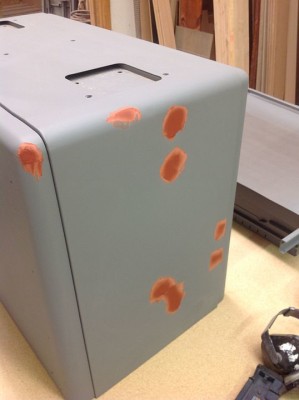
The parts sat in the back corner of the shop for weeks between when I primed them and when I was able to fill and final sand them. I used Bondo spot putty for the small dents and dings, and a two-part catalyzed lightweight auto body filler for a couple of the larger dents. The auto body filler is absolutely amazing for filling large dents. After mixing the correct amount of hardener to the filler, which turned it a nice robin’s egg blue, I had about 5 minutes of working time before it began to harden up. Once cured, the stuff is as hard as a rock and sanded quite nicely. A second coat of primer was all it took for the imperfections to disappear forever.

I wanted to use a really nice automotive enamel on this desk, which would give it just the right amount of “wow” without being too over-the-top. The problem is that automotive enamel is incredibly expensive! Like $300 per gallon expensive! And the enamel is only one ingredient. In addition to the enamel, you need a hardener and a reducer, which also cost a small fortune!
Over the years, as we have painted client’s projects with automotive finishes, I have been able to collect several different reducers and hardeners. But, alas, I only had the correct hardener in my collection, not the correct reducer. $75 later I had a pint of reducer and a quart of mis-tint enamel in a beautiful hunter green hue!
I applied two coats of paint to all the parts in order to ensure complete coverage. It is hard to see in the photos, but given the metallic additive in the paint, it was easy to get a spotty-looking finish. Multiple light coats were needed in order to evenly build the depth of color and prevent the pooling of the metallic material.

After the parts dried overnight, I began putting the drawers and cabinets back together. All of the aluminum handles were in great shape, so I simply buffed them with a Scotch-Brite pad in order to bring back the luster lost over the years.

Next, I turned my attention and creative energies to the top, which I wanted to make out of wood, for several reasons, some of which are quite obvious. I am a woodworker at heart, and while I find it exciting to dabble with metal and stone, I am drawn back to the beauty of wood. I wanted a top that had warmth and texture, to juxtapose nicely against the metal base, yet still pay homage to the desk’s industrial roots.
I racked my brain for weeks looking for the perfect solution, yet, in the end, the answer actually found me. We had two LVLs, sitting in a corner, leftover from a canceled project a few weeks ago. One afternoon, while cleaning up clutter, they caught my eye, and right then I knew that they would become the new desktop.
Each LVL measured 1.5″ thick, 22.5″ wide, and 84″ long, and both had a slight cup across the width. As such, I decided to rip them in half before sending them through the wide belt.

Sending each side through three or four times was all that was necessary in order to remove the many imperfections and achieve a smooth, flat surface.
Initially, my idea was to edge glue the LVL’s to achieve the 30″x72″ desktop. The problem is that even a nicely sanded LVL is butt ugly! It is construction-grade material after all, made for strength, not beauty.

So, instead of edge gluing the LVL’s, I ripped each board into 1.5″ wide strips, turned those strips 90 degrees, and glued 20 strips together to get the 30″ wide top.

Now, instead of looking at the pine face of the LVL, I am looking at 260 layers of fir veneer instead.
There were dozens of small voids exposed as a result of turning the LVL on edge, which were easily filled using a 2-part epoxy.
After final sanding with 150 grit, I sprayed on four heavy coats of sanding sealer to the top and bottom. The edge grain top just seemed to drink up the sanding sealer. After a final sanding using 220 grit paper, I applied two final coats of catalyzed lacquer.

My favorite part of the desk is by far the top. Both its look and its size. My previous desk was a hollow core door at just 60″ wide and 24″ deep. The extra 12″ of width and 6″ of depth are huge for me. It gives me the ability to spread out papers, files, and catalogs…or, it allows me to add even more clutter to the top of the desk!

All told, I spent $105 on materials and 17 hrs in order to give this tanker desk another lease on life!


Have something to say? Share your thoughts with us in the comments below.