
Q: What is the relationship between lumber grade and yield of parts?
A: A short question but the answer is involved. Many factors influence the results. For example, if your parts need to be clear on only one face (C1F), the yield can be three or more points higher than C2F. In the following discussion, the grade referred to is the grade when the lumber is cut into parts.
Also, the number of larger clear pieces required is important — the larger, the higher grade needed.
Finally, the cost of lumber in the different grades is really important. In fact, computer programs have been developed to weigh all the factors. You can contact the NE Forest and Range Experiment Station of the US Forest Service in Princeton, West Virginia for more information.
So, the following is a simplified discussion.
Lumber grades
The NHLA developed the standard hardwood grades based on large clear areas. The larger the area, the higher the grade. Stated another way, the best grade, FAS, must have one or two clear areas that occupy 83% or more of the lumber surface area. No. 2 Common is 50% of smaller areas.
In a cabinet plant, their studies showed the overall yield of parts they needed were 67% from FAS, 53% from No.1 Common, and 38% from No.2 Common. If you look only at yield, then your choice is FAS. But if you look at No.2 Common and the price is 40% of FAS, the lowest cost might be No.2. In reality, the best or optimum could be a mix of the three grades. A computer program will make it easy to get a good answer, which also includes the fact that No.2 takes longer to cut.
Part size
The chart here shows the effect of the length of the parts on yield. Now if you tell me you cannot use many parts under 10 inches long, my response is that you need to look at your product mix and maybe add a product that can use shorts.
Part width is also important. When ripping lumber, random width will have 4% more yield than 2-inch fixed width. Accepting only 4-inch widths instead of 2-inch will drop the yield by 15%. Obviously, this is why random width and then edge gluing into wide pieces make cents and sense.
Another factor is thickness — there is a 6-point drop for 8/4 versus 4/4.
Another subtle factor is the quality needed on the end of a part. Although a knot may be cut out, there is steep slope of grain around the knot that if left on the end of a part can lead to machining defects and some gluing defects. This is why trained employees who discern quality are so important.
| Shortest length | Yield |
| 30 | 64 |
| 25 | 67 |
| 20 | 69 |
| 15 | 71 |
| 10 | 73 |
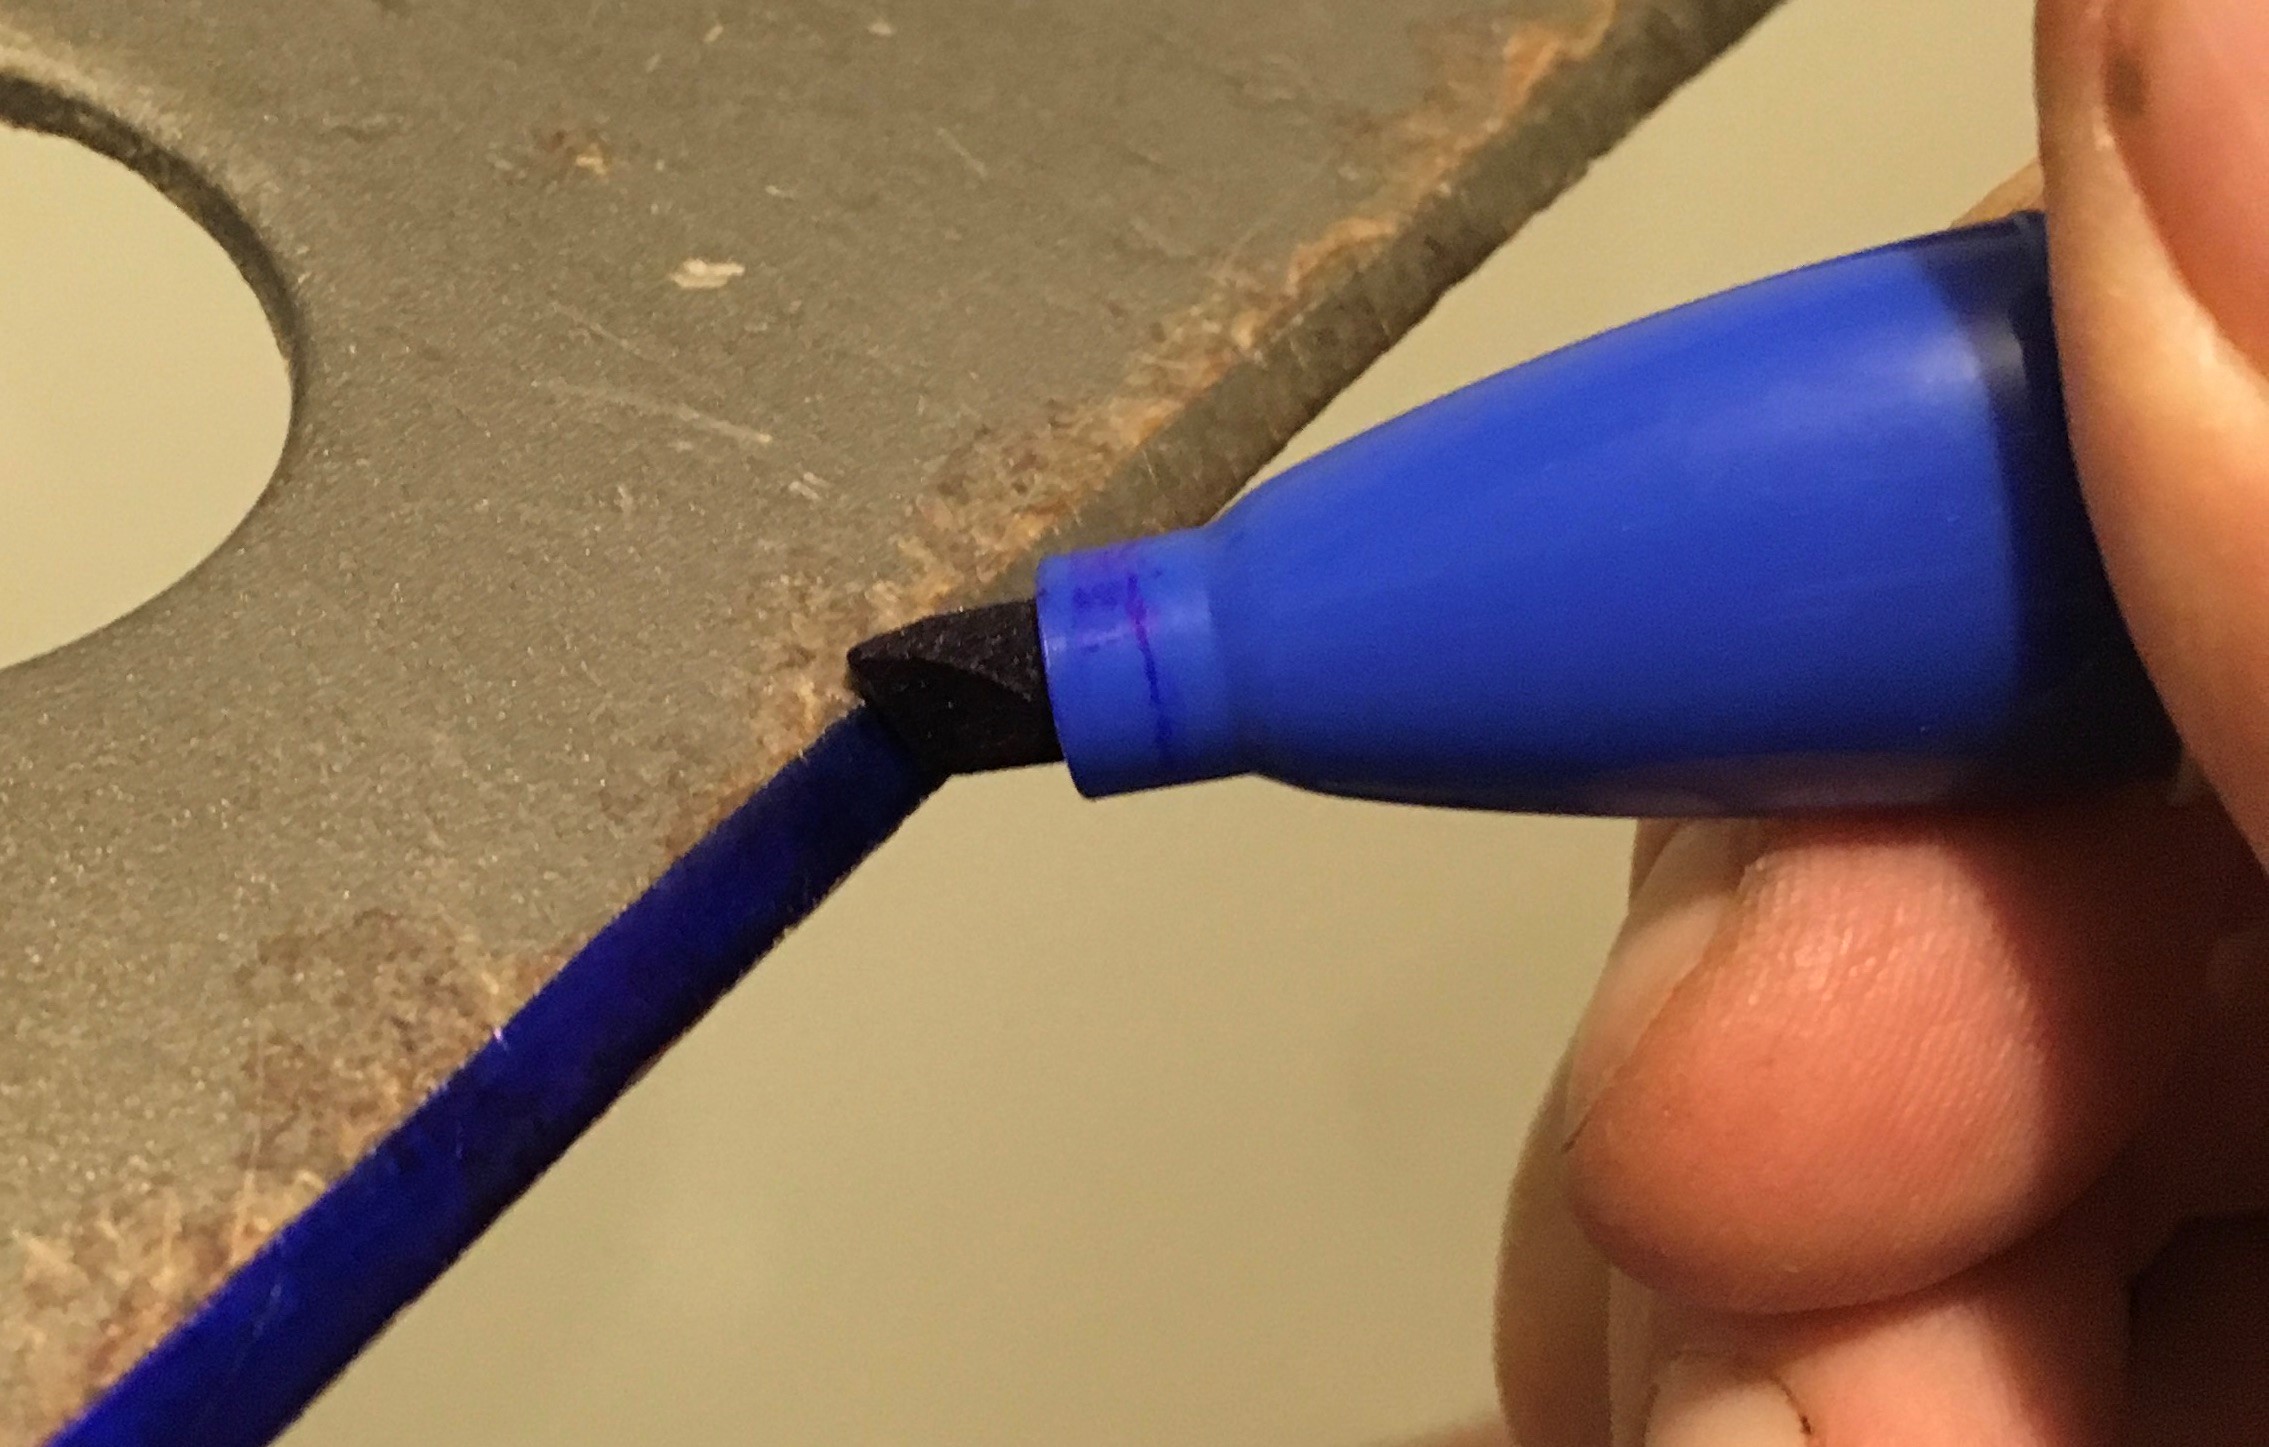
Q: When touching up the sharpness of a blade or tooth by hand, what is a good way to make sure I have the correct angle?
A: Here is a trick I use on my garden tools and knives. Take a marker pen and color the surface you will be touching up. Now, when you file the surface, if the angle is perfect, you will remove the entire mark. If you are too steep, then you will leave a mark on the surface at the heel; vice versa if you are too flat. This idea works on kitchen knives, lawn mowers, and most cutting tools, like the garden hoe in the photo.
Q: Could you go over the suggestions to avoid splitting when nailing, stapling or screwing near the edge of a piece?
A: I am glad to go over this as it is a critical concept.
To begin, wood is essentially a bunch of long, miniature soda straws. These cells, as we call them, run up and down in the tree, and so they run lengthwise in a piece of wood. The cellular structure is amazingly strong in the living tree, transporting fluids (sap) and holding 1,000 pounds and more upright. In the living tree, except in a tornado or lightning striking, the tree is not subject to splitting, so this strength property is often quite low. (Analogy: It is amazing that when you are splitting firewood, once you get the wedge started at one end, often one blow will split the wood into two.). Remember this low splitting strength of wood.
Let’s consider a fastener as it goes into the face of a piece of wood. Somehow, the wood cells have to move, break, squish or tear to make room for the fastener. What if the fastener is large in diameter? Obviously, we need the cells to move a lot with a large diameter fastener. With a small, weak fastener, the wood cells might even bend the fastener so it fits in the cell openings — we might say, “Follows the grain.” This bending is more likely with stronger wood species.
Now, here is a key. What if the end of the fastener is quite sharp? As the fastener goes into the wood, the fastener will act like a wedge — the point will not cut the wood cells to make room for the fastener. Instead, it pushes the cells apart. The end result that we can see, maybe with magnification, is that the fasteners make a small split in the wood. The fastener is held on the two faces along the length, but the other two faces are not touching the wood because of the miniature split. Not the strongest situation. And if the split is near the end, it will easily travel to the end of the piece.
So, we need fasteners without sharp points. That is, we want the fastener to tear open a hole by tearing and then squishing the torn cells. The tendency to develop a miniature split is close to zero. They do make pointless nails and staples — or you can file off the points. (Analogy: Consider the case-hardened masonry nails that have a flat point.)
Or, here is an even better option. How about drilling a hole for the fastener ahead of time. This hole can be up to 80% to 90% of the fastener’s diameter (not counting the thread diameter of a screw), depending on species, fastener, etc. Now, when the fastener is inserted, the entire fastener will be held by the wood, actually giving higher strength than the same fastener without a pilot hole (because of the miniature split that likely develops).
Q: What is the role of pressure when gluing wood?
A: Pressure is indeed a key variable when gluing wood and can account for many weak joints. Here are five starting points. As you gain experience, you will include other variables such as adhesive viscosity, temperature, and more.
First and foremost, the idea that more pressure pushes glue into the wood is totally false, unless you were gluing end grain. Remember that wood is made of a bunch of miniature, long and skinny soda straws. When made by the tree, these are glued together side by side, so it is impossible to get any liquid as thick as glue into the sides of the bundle of straws no matter how hard you push.
Second, every popular woodworking adhesive has a minimum and maximum glue line thickness. If the glue line is too thin, there is not enough adhesive for the chemical and mechanical process of hardening, or setting the adhesive can occur. Epoxy is probably the most sensitive to thin glue lines, but PVA adhesives require at least 0.002 inches thick and PUR 0.003 inches. Of course, the glue or adhesive manufacturer will have the correct number for their adhesive. This minimum translates into not using excessive pressure.
Third, every adhesive also has a maximum thickness. The manufacturer knows this. This requirement translates into using enough pressure to squeeze out excess adhesive so that the gap between the wood pieces is within the maximum thickness of the joint.
Fourth, oftentimes the adhesive is spread on only one of the pieces of wood. Pressure is then involved in pushing the adhesive onto the “unspread” piece of wood.
Fifth, assuming the two pieces have flat gluing surfaces, pressure creates a uniform thickness joint, assuming the pressure is uniform along the length.
Q: We are making some specialty sugar maple cabinet doors of six or eight individual staves. We have our people choosing the colors of the staves so they match and complement each other within each door. The problem is that when we have a perfect match and then turn the door 180 degrees so we are looking from the other, direction, there are one or two staves that do not match. It looks good from one direction but not the other. Insight?
A: This unique property of hard maple does exactly this. It has to do with the grain angle and the reflected light at different angles. There is no cure, other than working with finishes to get better reflections.
Q: We have a shelf that is 0.75 inches thick. How much thicker does the shelf have to be to double the stiffness?
A: Stiffness increases with the third power of thickness. So, a shelf that is 61/64 inch thick will be just over twice as stiff as a 3/4-inch shelf. Assumptions include straight grain, no knots, no moisture change, same wood density, maybe one hour of being loaded, size of the load, and more.
Trivia: Twice as thick means twice as strong. There are several other ways to increase stiffness, such as adding a support under the shelf in the rear. Or we could add a nose piece on the front that is wider than the shelf thickness…it looks decorative, but tightly fastening to the front of the shelf can be a real challenge.


Have something to say? Share your thoughts with us in the comments below.