One of the latest projects we completed was a buffet constructed from solid walnut and walnut plywood, for an interior design client in San Francisco, for a Chicago client of his.
 |
As with most projects, we were supplied with an inspiration picture which we then modified to fit the clients needs. The main design elements that they wanted to include in the new piece were the slab door and drawer fronts, the heavy solid frame surrounding the doors and drawers, and the design of the base. The buffet was to be 106″ long, 22″ deep, and 32″ tall. The size of the buffet would prevent the homeowners from being able to get it into their high-rise condo in Chicago, so we would need to engineer it so it could be dis-assembled and then re-assembled in the home.
 |
Here is the final design of the buffet. The top and bottom would be full width and depth and the sides would be captured between them. The three cabinets inside that frame would include two doors and two drawers, which would be made to look like three drawers, two file pull-outs, and two pull-out trays.
On the inspiration piece, the outer frame of the buffet had mitered corners, which we would have done if the piece was going to stay as one complete unit, but with the outer frame needing to be dis-assembled, I couldn´t think of any way to bring a 22″ miter together, using a mechanical connection, that would achieve a seamless and perfect miter joint.
 |
We began by building and connecting the three cabinet boxes. We built the boxes just like we build all of our cabinet boxes, except that we used more screws than normal, increased the thickness of the back from 1/2″ to 3/4″, and glued and screwed the back into the dados running along the sides, to add extra, extra strength to each box.
We then milled, glued, wide belted, and trimmed the solid walnut top, bottom, and sides and joined the seven pieces together using cabinet screws, ensuring a solid, but reversible connection. First, the cabinet boxes are screwed together, then they are connected to the base. Next, the sides are connected to the cabinet boxes and to the base, and lastly, the top is indexed via two dowels and secured through the cabinet boxes.
 |
The slab doors and drawer fronts are walnut plywood that we cut from one wide piece, to optimize grain flow from left to right. Since the width from outside to outside of the doors was ~102¨, and the walnut plywood we used had the grain running vertically along the 48¨ width, we had to piece the walnut plywood together with two seams. The seams actually disappeared in the final piece because we hand picked a piece of walnut plywood with consistent color and grain pattern throughout the sheet, allowing the three pieces to butt side-to-side with minimal color or grain differences.
 |
Here is a close-up of the base, with the block feet in the corners, and a small chamfer at the top. Don’t mind the bucket!
 |
Behind the left door are two file drawers, complete with aluminum file hangars, fitting either legal or letter folders. All the drawers are solid wood, dovetailed construction, mounted on 21¨ DynaPro undermount slides. Both doors are mounted using Grass Tiomos soft-close hinges.
 |
The top drawer, which is 49.5¨ wide, is divided into three equal sections.
 |
The bottom drawer is really one deep and wide drawer, even though it is made to look like two smaller drawers. This drawer is designed to hold photo albums vertically, which means once the drawer is fully loaded, there would be some serious weight on the undermount slides. Since the standard undermounts are only rated for 88 pounds, we opted to upgrade to heavy-duty Grass DynaPros, which have a weight capacity of 132 pounds.
 |
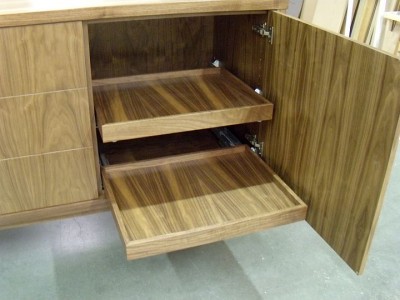
Behind the right door are two pull-outs, constructed from walnut plywood, to hold the client’s printers.
 |
Here is the final piece. We could not have been happier with how it turned out, and both the interior designer and the clients were elated.


Have something to say? Share your thoughts with us in the comments below.