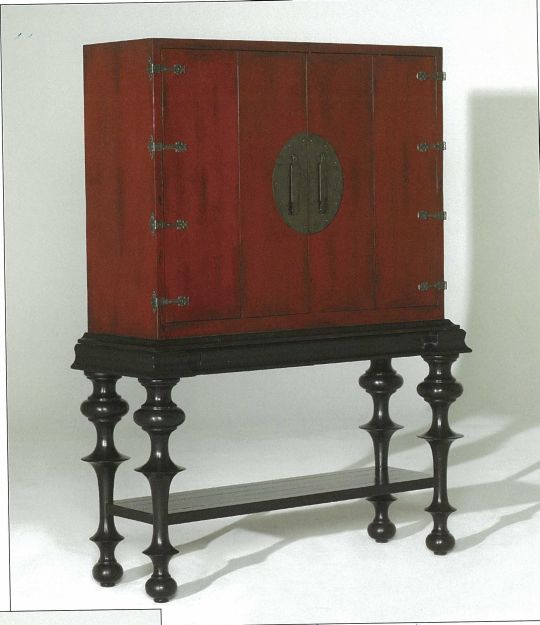


A custom alder storage armoire began with two inspiration pictures from the interior designer, Suzie Hall of Cornerstone Interior Design.
The first one shows what the cabinet and upper trim work of the armoire will look like. The cabinet is going to measure 45″ wide, 50″ tall, and 20″ deep. The cabinet will then sit on a base unit comprised of a top plate, four turned legs, and a lower stringer.
The upper cabinet will be painted a rich red color and distressed and glazed to add a nice and rich aged look.
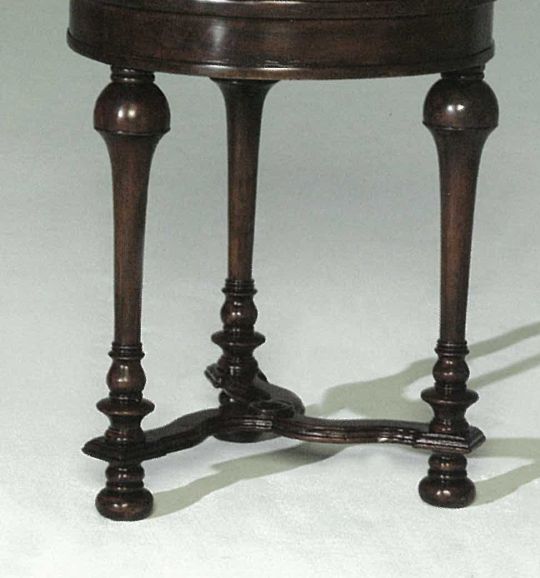
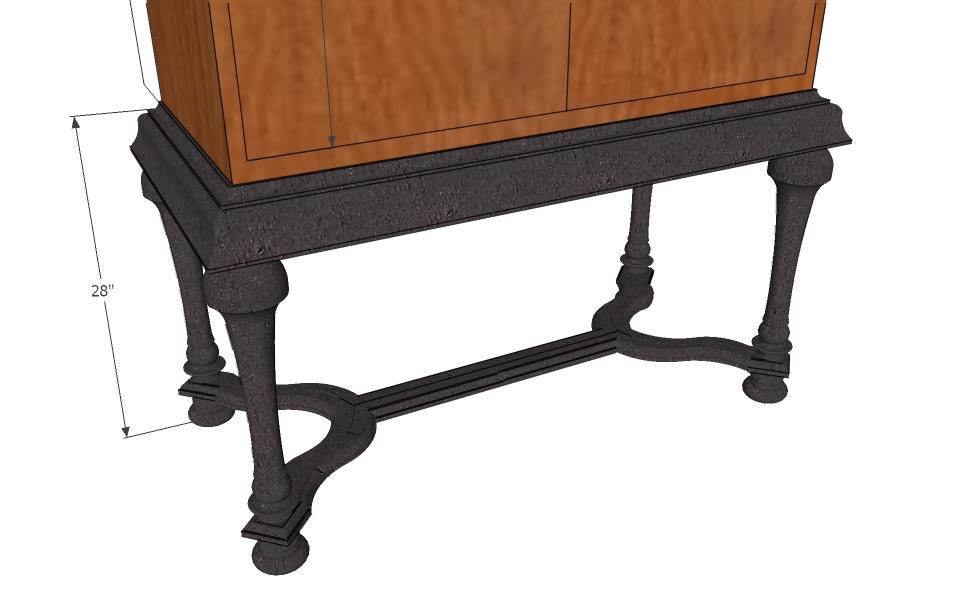
While the armoire cabinet and trim details are inspired from the first picture in the series, the turned legs and the stringer are based on the second picture. The base legs will be turned from solid alder as well, and will be roughly 5″ in diameter at their widest point. The legs will be stained a semi-transparent black color.
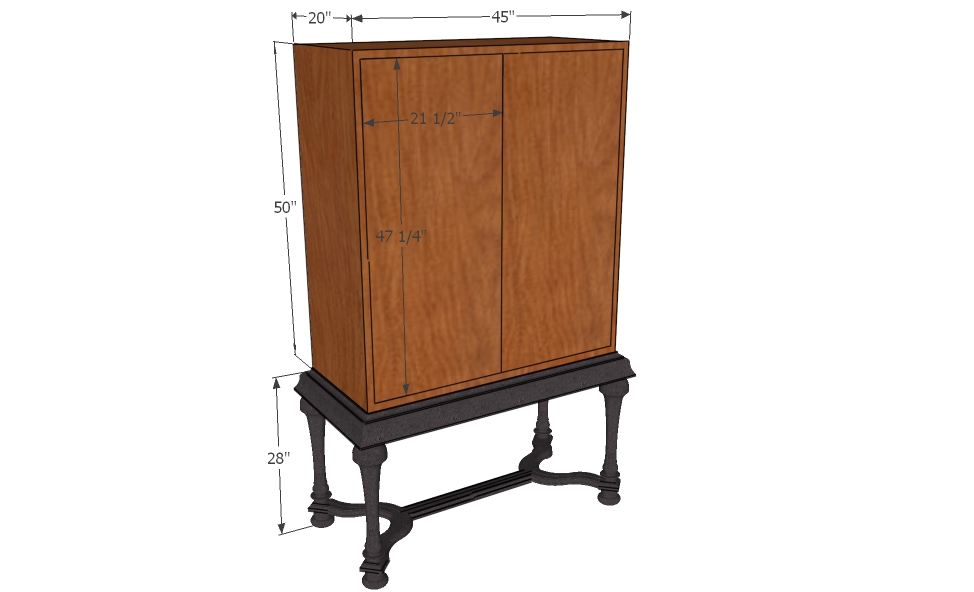
The final design of the armoire, is shown in Sketch-up renderings. Each of the doors on the upper cabinet will be connected using a pair of 6″ strap hinges and will have a large handle in the middle.
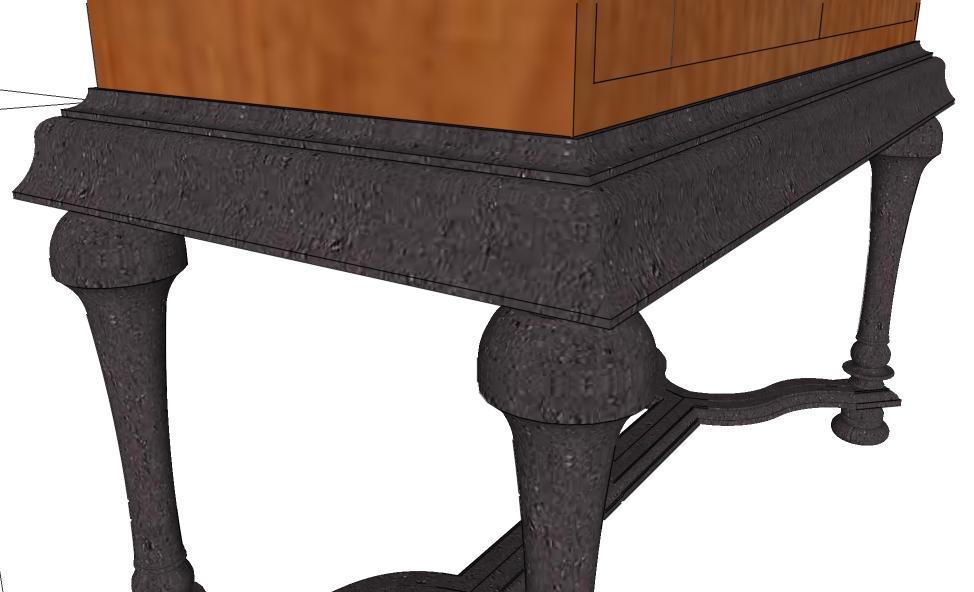
A closer look at the upper trim work of the base shows the trim will be three different pieces of moulding assembled to achieve the final look.
Also, rather than having a lower shelf, we will be replacing it with a simple, but elegant, curved stringer connecting all four legs.
We sent the legs to be turned at Turnco in Vancouver. Here is what the turned legs and feet look like when they are quartered. We dimension the drawings and send them to a turning company in Vancouver BC, who use them to create the final pieces.
In the last entry, I left off with the top of the console table in the vacuum bag. In this entry, we will begin with the top fully veneered.

As you can see in the picture, all of the ribbon Sapele veneer on the sides has the grain oriented vertically and the grain of the top is parallel to the longest side. We veneered each surface individually, which meant that the tabletop took five rounds to complete the veneering. Each time, the tabletop spent three hours in the bag, and at least four hours outside the bag to help the glue cure. After each round we spent a few minutes checking the edges of the veneer and re-gluing any places that had not fully adhered.
A quick note about vacuum pressing. The bag itself exerts up to 1700 psi worth of pressure on the veneer. As the veneer is pressed into the substrate, the air is expelled from the glue joint and a bond is created within an hour or so. But, for the glue to for a permanent bond, it requires the water to be evaporated, which is impossible since the vacuum bag is air tight and therefore void of air in the first place. Thus, when a project is removed from the vacuum bag, it feels clammy and damp and needs a few hours in the open before the veneer is fully set.

We repeated the veneering process on the base of the table; it was a bit easier since the sides were not as angled as those of the top.

It was now time to drill the hole for the decorative metal bar that would be on the top point of the front and back of the base. We ordered two 1.5″ lengths of 1″ diameter solid aluminum bar from a local metal supplier, sanded the pieces with 320 grit paper to give them a brushed look, and eased over all the edges. On the drill press we then set up a shim that would drill a 1″ hole parallel to the floor. Since the faces of the front and back are not vertical, but angled inward about 3 degrees, if we set the back flat on the drill press table, the hole would be drilled at a -6 degree angle to the face and -3 degrees horizontal. By shimming the piece by .5″, we were able to drill the hole at a -3 degree angle to the face, which translates to horizontal. This may seem to be over-thinking, since only .5″ of the bar would be seen, but the details are what matter in custom furniture.

Next, we turned our attention to connecting the two pieces. The space that the two pieces share is pretty tight and did not make for an easy work space. We decided that the best way to connect the two pieces would be to use dowels. We drilled and glued six dowels into the base.

After the dowels were glued into the base, we turned the top upside down, and attached the two pieces. We used a polyurethane glue for this final glue-up because the glue would expand and help fill any small voids that were present inside the top and base.The tape and paper ensured that the expanding polyurethane glue would collect on top of the paper rather than on the veneer’s surface.

We allowed the glue to set overnight before we flipped the table right side up. We removed the tape and paper, scraped off any excess glue, and gave the entire table a final hand sanding with 220 grit paper. We then took the table into the finishing room and applied a dark brown oil-based stain, two coats of sanding sealer, and a coat of bright-rubbed conversion varnish.

The final product came out absolutely beautiful! The brownish red of the Sapele work perfectly with the whites, grays, and blues of the living room.


Have something to say? Share your thoughts with us in the comments below.